Master Your Woodworking Projects with Raised Panel Router Bits
Creating raised panel cabinet doors can elevate the look of any woodworking project, providing a classic and professional finish. Using Raised Panel Router Bits, you can achieve these elegant designs with precision and ease. Whether you're a seasoned woodworker or just starting, these bits are essential for crafting high-quality cabinet doors.
What Are Raised Panel Router Bits?
Raised panel bits are specialized tools designed to cut the intricate profiles on the edges of panel doors, giving them a raised center. These bits come in various shapes and sizes, allowing you to create different styles of panels to suit your design preferences.
How Do Raised Panel Router Bits Work?
These router bits work by cutting into the edges of the panel, shaping the wood to create a raised center and a decorative edge. The bit's profile determines the final shape of the panel, and with the right technique, you can achieve a smooth, professional finish.

Amana Tool 54117 Carbide Tipped Traditional Raised Panel 15 Deg features a relatively gentle incline;

whereas, Amana Tool 54532 Carbide Tipped Traditional Vertical Raised Panel 15 Deg is steep.
What is a Back Cutter?
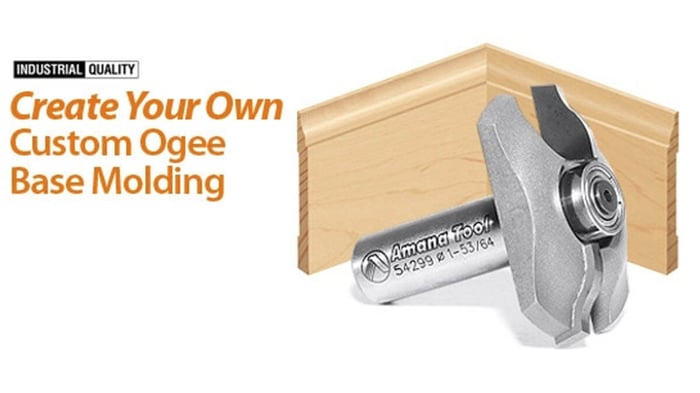
A back cutter is a feature on some raised panel bits that allows for the simultaneous cutting of the back side of the panel. This ensures the panel fits flush with the frame, providing a cleaner, more professional look. Using a bit with a back cutter can save time and improve the overall quality of your project.

Amana Tool 54229 Carbide Tipped Cove Raised Panel with Back Cutter
What Materials Can Be Used with Raised Panel Router Bits?
Raised panel bits can be used with a variety of materials, including hardwoods, softwoods, MDF, and plywood. The key is to ensure the material is properly prepared and that you use the appropriate feed rate to avoid burning or chipping the wood.
What Are the Benefits of Using Raised Panel Router Bits?
1. Creates Professional-Looking Panels
Using raised panel bits allows you to create detailed, professional-looking panels that can enhance the aesthetic appeal of any cabinetry or furniture project.
2. Saves Time and Effort
These bits are designed to make precise cuts quickly, saving you time and effort compared to traditional hand tools. The efficiency of using a router bit can significantly speed up your workflow.
3. Versatile for Different Woodworking Projects
Raised panel bits are versatile tools that can be used for various projects beyond cabinet doors, including wainscoting, decorative panels, and furniture components. Their adaptability makes them a valuable addition to any woodworker's toolkit.
What Are the Different Styles of Raised Panel Router Bits?
1. Traditional Style
The traditional style features a simple, classic profile that suits most cabinetry and furniture designs. It's a timeless choice that provides a clean, elegant look.
2. Cove Style
The cove style features a concave profile that offers a softer, more rounded edge. It's a great choice for projects where a more subtle and understated look is desired.
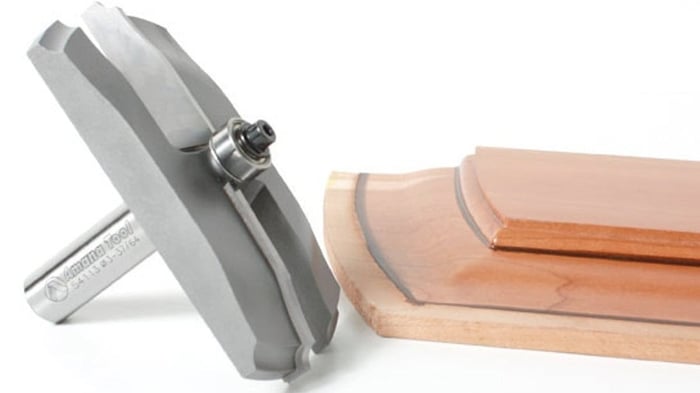
3. Ogee Style
The ogee style has a more intricate, S-shaped profile that adds a touch of sophistication to your panels. This style is perfect for creating a more decorative and ornate finish.

Amana Ogee Raised Panel Router Bits come either 2+5/8" or 3+3/8" in diameter.
How to Use Raised Panel Router Bits?
1. Select the Right Router Bit for Your Project
Choosing the right bit is crucial for achieving the desired look. Consider the style and profile you want to create, and select a bit that matches your project's requirements.
2. Set Up Your Router and Bit
Install the router bit in your router and adjust the height to achieve the desired cut depth. Make sure the bit is securely fastened and that the router is set up on a stable surface.
3. Prepare Your Wood for Routing
Ensure your wood is properly prepared by cutting it to size and sanding it smooth. Secure the wood firmly to prevent movement during the routing process.
4. Make the Cuts with the Router Bit
Feed the wood steadily into the router bit, maintaining a consistent speed and pressure. Multiple passes may be necessary to achieve the final profile, especially for deeper cuts.
5. Finishing Touches and Sanding
After routing, sand the edges and surfaces to remove any rough spots and ensure a smooth finish. Apply your preferred finish or paint to complete the project.
What Safety Precautions Should Be Taken When Using Raised Panel Router Bits?
Safety is paramount when using power tools. Always wear protective gear, including safety glasses and hearing protection. Ensure your work area is clean and free of distractions. Follow the manufacturer's instructions for your router and bits, and never force the material into the bit. Keep your hands away from the cutting area and use push blocks or jigs to guide the wood.
Frequently Asked Questions About Raised Panel Router Bits
1. What types of wood can I use with raised panel router bits?
You can use raised panel router bits with a variety of woods, including hardwoods like oak and maple, softwoods like pine, and even composite materials such as MDF and plywood. The key is to ensure that the wood is properly prepared and that you use the correct feed rate to prevent burning or chipping.
2. How do I maintain and care for my raised panel router bits?
Maintaining your router bits involves regular cleaning to remove resin and pitch buildup, which can affect performance. Use a soft brush and appropriate cleaning solution. Sharpen the bits as needed, but be cautious not to alter the profile. Store the bits in a dry, safe place to avoid damage and rust.
3. Can I use raised panel router bits with a handheld router, or do I need a router table?
While it is possible to use raised panel router bits with a handheld router, it is generally recommended to use a router table. A router table provides better stability and control, which is especially important for making precise and consistent cuts. It also enhances safety by allowing you to use push blocks and other safety accessories more effectively.